How to Manually Focus Mirrorless Camera
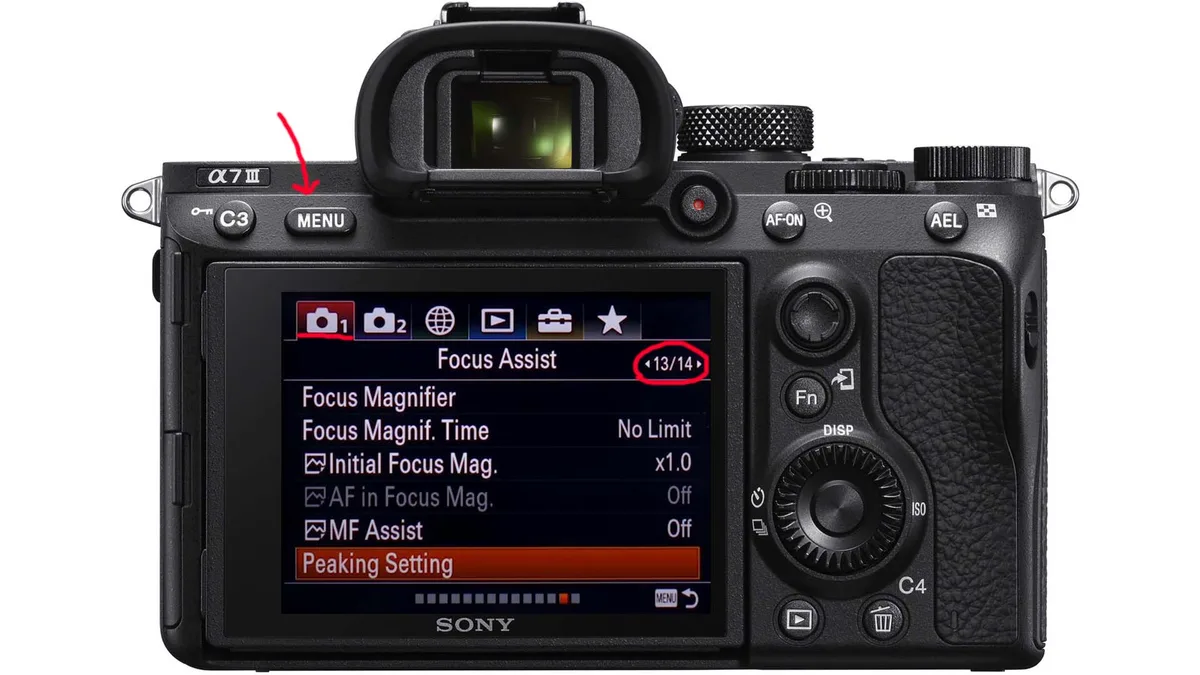
Image source: Web (Bing) / chancetalkscameras.com (Web image (fair-use with source credit))
Why Manual Focus Can Be Tricky on Mirrorless (and Why It's Worth It)
The biggest difference between mirrorless and DSLR manual focus is the viewfinder. A DSLR uses an optical viewfinder with a ground glass screen. You see the actual light coming through the lens.
A mirrorless camera shows you a digital feed from the sensor. That electronic viewfinder (EVF) can be harder to judge by eye alone.
Then there's the lens itself. Most modern mirrorless lenses use fly-by-wire technology. There's no physical connection between the focus ring and the lens elements.
Turning the ring sends an electronic signal to the motor. The response can feel vague compared to a mechanical lens. You also lose the hard stops.
Mechanical lenses have a physical end point at infinity. Fly-by-wire lenses just keep spinning.
So why bother? Manual focus gives you precise control that autofocus can't match. It works in low light where autofocus hunts.
It's silent for video work. You can use vintage lenses from the film era. And it's essential for techniques like focus stacking.
The key is understanding that manual focus on mirrorless is a different skill. You're not reading a split prism. You're interpreting digital aids.
Once you learn those aids, you'll have more control than any DSLR could offer. Going fully manual with your camera settings complements this approach. When you're already controlling focus by hand, it makes sense to take full control of exposure too.
Essential Focus Aids: Peaking, Magnification, and Getting the Diopter Right
Three features make manual focus possible on mirrorless cameras. You need to understand all of them before you can focus reliably. Let's break each one down.
Focus peaking highlights the edges of your subject that are in sharpest focus. It overlays a colored shimmer on those areas. Most cameras let you choose red, yellow, white, or blue.
Red is usually the easiest to see. You can also adjust the sensitivity. High sensitivity shows more edges but can be noisy.
Low sensitivity is more precise but harder to see.
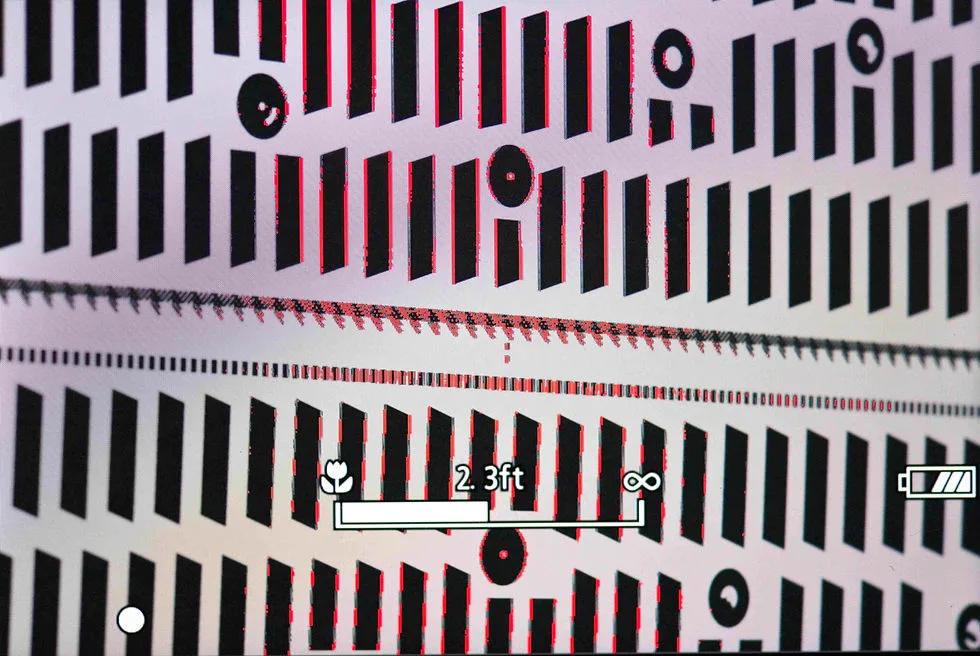
Image source: Bing (Web (fair-use with source credit))
Focus magnification zooms into a portion of the frame inside the EVF or rear screen. Typical ratios are 5x, 10x, and sometimes 14x. This is the most accurate way to confirm focus.
You assign it to a custom button or the rear control dial. Tap it once to zoom in, then fine-tune with the focus ring. Tap again to zoom out.
This is similar to using the rear screen for precise composition, but with a focus-specific purpose.
Diopter adjustment is the one everyone forgets. That little wheel next to the eyepiece adjusts the EVF to your eyesight. If the viewfinder itself looks blurry, you'll never get sharp focus.
Set it once with the camera turned off. Look through the EVF and turn the diopter until the text and icons are crisp. Then leave it alone.
Step-by-Step: How to Manually Focus on Any Mirrorless Camera
The process is the same across every major brand. Sony, Canon, Fujifilm, Nikon, and Panasonic all follow this general workflow. Here's the exact sequence we recommend.
Set the lens to MF. If your lens has a physical switch, flip it to manual. If not, change the focus mode in the camera menu to MF or DMF (direct manual focus).
Adjust the diopter. Do this once and forget it. Without this step, everything else is guesswork.
Enable focus peaking. Go into the menu under focus assist or AF/MF settings. Turn peaking on and pick a color that pops against your subject. Red works well for most scenes.
Assign a magnification button. Find the setting for "focus magnifier" or "MF assist." Map it to a custom button or the rear dial. This becomes your most-used tool.
Frame your shot. Use the EVF or rear screen to compose. Turn the focus ring until the subject looks roughly sharp.
Magnify the view. Press your assigned button. The camera zooms into the center of the frame. If your subject is off-center, move the magnified area with the joystick or touch screen.
Fine-tune with the focus ring. Watch the peaking highlights appear on the edges. Turn slowly until the shimmer is strongest and the image looks crisp.
Unmagnify and check. Release the magnification. Check the overall composition. If something is off, repeat steps 6 and 7.
Image source: Web (Bing) / stockcake.com (Web image (fair-use with source credit))
This method is critical for landscape work where you need sharpness from foreground to infinity. The same troubleshooting approach applies if the image looks soft after following these steps.
Common Mistakes That Ruin Manual Focus (and How to Avoid Them)
Even experienced photographers make these errors. The good news is they're all easy to fix once you know what to watch for.
Skipping the diopter adjustment. This is the most common mistake. If the EVF looks soft, you'll chase focus that isn't there. Check the diopter before you shoot anything important.
Using peaking on low-contrast scenes. Focus peaking works by detecting edges. Against a flat white wall or a cloudy sky, it shows false positives everywhere. Switch to magnification alone for those situations.
Forgetting to switch to manual mode. Your lens might be in AF while you think you're focusing manually. The camera overrides your ring input. Check the switch or the menu before you start.
Relying only on peaking. Peaking is a guide, not a guarantee. It shows contrast edges, not true focus. Always confirm with magnification for critical shots.
Not checking magnification at multiple points. Focus on the eyes in a portrait and then check the ears. If the ears are sharper, you missed the plane. Magnify different areas to verify.
Over-relying on peaking in bright light. Strong sunlight washes out the peaking overlay. It becomes invisible. Switch to magnification or use a hood on your rear screen.
Getting the Best Results: Use Cases and Pro Tips
Manual focus shines in specific situations. Here's where it outperforms autofocus and how to get the best results.
Landscape photography. Use hyperfocal distance focusing. Set your lens to a small aperture like f/8 or f/11. Magnify a point about one-third into the scene.
Focus there. Everything from near to far will be acceptably sharp. A tripod is essential for this technique.
The same principles apply to landscape work with any camera system.
Macro photography. Autofocus struggles with tiny subjects and shallow depth of field. Use manual focus with magnification at 10x or 14x. Move the entire camera slightly forward or backward to fine-tune.
A focus rail makes this much easier.
Portrait photography. Focus on the eyes. Use peaking with a red overlay. Magnify to 5x and confirm the eyelashes are sharp.
The shallow depth of field at wide apertures demands precision. Shooting portraits manually gives you control over exactly where the sharpness falls.
Video work. Manual focus is standard for cinema. Use a follow focus rig for smooth pulls. Mark your focus points on the lens barrel or with tape.
Practice the pull before you hit record. The silence of manual focus is a huge advantage over autofocus motor noise.
Astrophotography. Autofocus fails completely in the dark. Magnify a bright star to 10x. Turn the focus ring until the star is the smallest possible point.
Then lock the focus ring with tape so it doesn't shift during the night.
Frequently Asked Questions
Is manual focus faster than autofocus on mirrorless cameras?
No, autofocus is faster in most situations. Manual focus wins for precision and control, not speed. The exception is zone focusing for street photography.
Pre-set your focus distance and aperture. Then you can shoot without waiting for autofocus to lock.
Why does my manual focus look soft in the viewfinder but sharp on the computer?
Your diopter is likely off. That small adjustment wheel next to the eyepiece sets the EVF to your eyesight. Turn it until the text and icons look crisp.
Do this with the camera off or pointed at a flat surface. A blurry viewfinder makes you chase focus that isn't real.
Can I use vintage manual lenses on a mirrorless camera?
Yes, with a simple adapter. Mirrorless cameras have a short flange distance. That makes them compatible with almost any vintage lens.
You lose electronic communication, but focus peaking and magnification still work. This is one of the best reasons to own a mirrorless camera.
What peaking color should I use?
Red is the most visible for most scenes. Switch to yellow or white for red subjects. Blue works well against green foliage.
The best color is the one that contrasts with your subject. Test each option in your camera menu.
Does focus peaking work in video mode?
Yes, most mirrorless cameras support peaking in video. The overlay appears on the live feed. You can see it in the EVF and on the rear screen.
This is a huge advantage for manual focus video work. It makes pulling focus much more predictable.
Why doesn't my focus ring have a hard stop at infinity?
That's fly-by-wire design. Modern mirrorless lenses use electronic focus rings. They spin continuously without physical stops.
The infinity point is at the end of the electronic throw. You can calibrate it in some camera menus. For astrophotography, use magnification to confirm infinity focus manually.

Similar Posts
































