Viking Gate Operator Troubleshooting
Your Viking gate operator just clicks, hums, and stops halfway across the driveway. Viking Gate Operator Troubleshooting comes down to a handful of known failure points. If you know where those live, you can fix most issues in under an hour without calling anyone.
Manufacturer specs confirm that most Viking models run on a 12-volt DC gear motor backed by a sealed battery, with a control board that governs everything. Per UL 325, entrapment protection must stay functional after any repair. The real skill is knowing what to touch and what to test first.
Once you understand that chain, the rest is just a logical process.
Why Accuracy Matters in Gate Operator Troubleshooting
Our research keeps showing the same pattern. Most gate failures are misdiagnosed. An overloaded gate gets blamed as a motor failure.
A dead battery gets blamed as a bricked control board. After walking through hundreds of user reports and technician walkthroughs, the pattern is clear. Guessing wastes money, time, and sometimes the whole operator.
A control board replacement can run $150 to $400. A limit switch costs roughly $15. Knowing which one you actually need is the entire battle.
As of 2026, the most common reason a Viking gate operator goes fully dead isn't a failed motor. It's a blown fuse, a tripped breaker, or a transformer that quietly stopped outputting power.
What precision actually saves you
- Time: The right diagnosis fixes the gate in one visit, not four.
- Money: Parts are non-refundable once installed in most cases.
- Safety: A misdiagnosed operator can react unpredictably.
- Warranty: Some repairs void coverage if wrong components are forced.
Why generic advice fails here
Most generic troubleshooting guides tell you to "check the sensors" and "reprogram the remote." That skips the real issue. Viking operators talk to you through blink codes, audible beeps, and battery voltage under load. You have to read those signals in the right order.
Jumping to the motor or control board first is how people replace good parts for no reason.
A solid diagnostic flow is simple: verify input power, test the battery, check the photo-eyes, read the blinking LED on the board, and let the symptom narrow the rest. That sequence removes almost all guesswork.
The real cost of guessing
One homeowner diagnosed a "bad motor" and bought a new Viking gate operator unit for around $600. The old motor was perfect. The actual problem was a misaligned magnetic limit switch that made the gate think it had traveled too far and blocked the call for power.
A $15 part and twenty minutes would have fixed it.
So the first step in proper Viking Gate Operator Troubleshooting isn't grabbing a wrench. It's reading the evidence.
How Viking Gate Operators Work (and Where They Break)
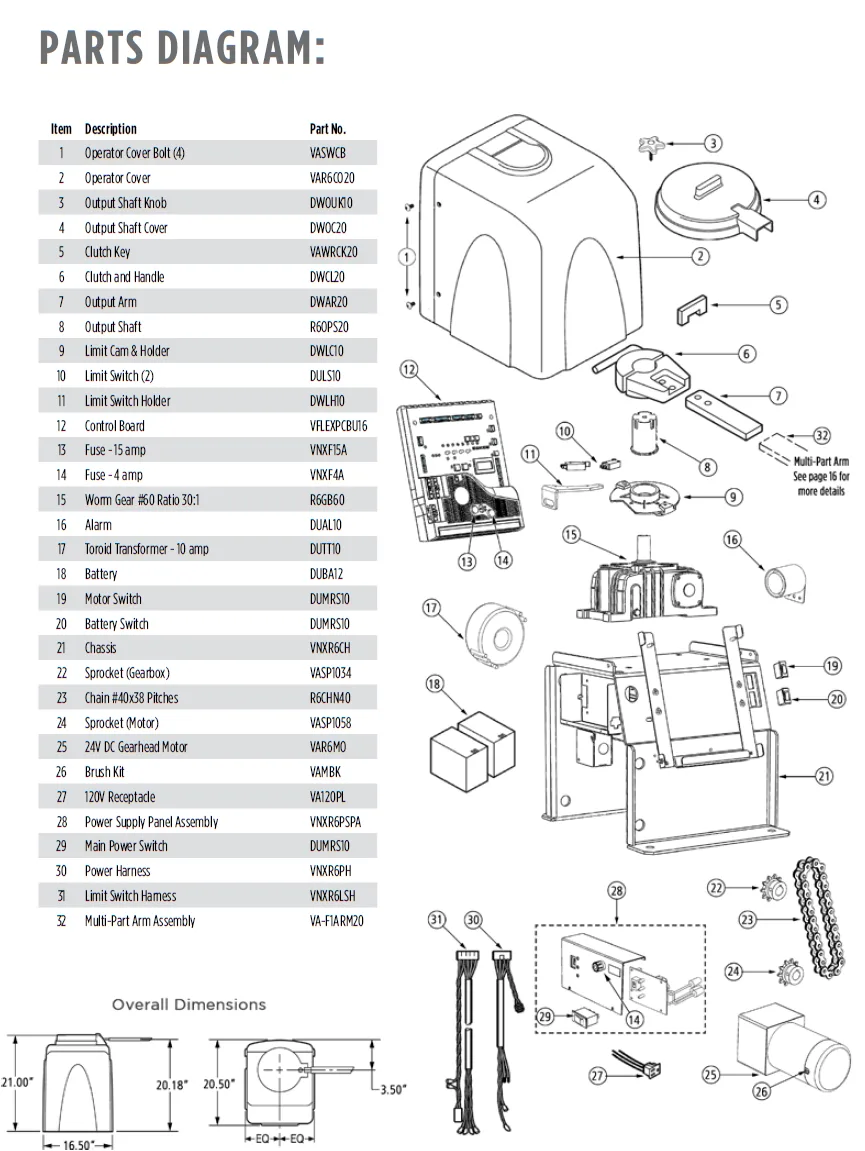
Image source: Bing (Web (fair-use with source credit))
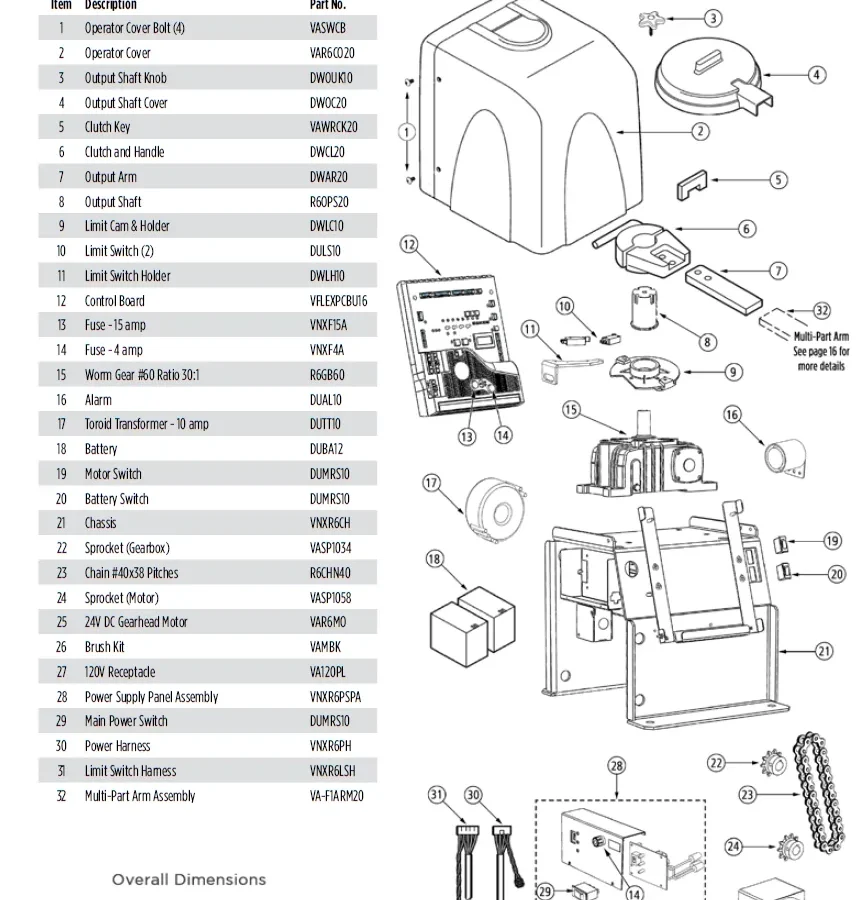
Before touching anything, you need a mental map of your operator. Every Viking model uses the same foundational architecture. Once you understand the six main components, half of troubleshooting feels obvious.
The six components that matter
| Component | What it does | When it breaks |
|---|---|---|
| Control board | Reads inputs, sends power, stores codes | Dead relays, blown fuses, corrosion |
| DC motor | Turns the screw or rack to move the gate | Overheating, worn brushes, failed capacitors |
| Limit switches | Tell the board when to stop open/close | Misalignment, loose brackets, debris |
| Photo-eyes | Detect obstructions in the gate path | Dirty lenses, sun glare, broken wiring |
| Battery | Provides backup power and smooth DC voltage | Sulfation, failure to hold charge |
| Transformer | Converts 120V AC house power to low-voltage DC | Overheating, open windings |
The power chain
The transformer plugs into your household 110-volt outlet. It converts that to low-voltage DC, which charges the battery. The battery feeds the control board, and the control board sends power to the motor when a remote, keypad, or wall station tells it to.
Here is where most beginners get it wrong. The motor can still run with a dead transformer if the battery is charged. The battery acts as a buffer.
So a gate that works fine on backup power can fail when the transformer dies. A drained battery can kill the whole system even with good AC power coming in.
Why limit switches get blamed for everything
Limit switches are small magnetic or mechanical sensors mounted near the gate track and arm. They physically tell the board to stop when the gate is fully open or fully closed. They also handle reverse direction.
If a limit switch shifts by a quarter-inch, the gate may stop early, slam, or refuse to move. Many owners assume a dead motor and order expensive parts. The switch just needed a push back into place.
Inspecting these is cheap, fast, and the highest-yield step in Viking Gate Operator Troubleshooting.
How the control board communicates
The control board blinks an LED to show error codes, clicks relays to send power, and stores learned positions. Understanding its blink patterns turns a random electrical box into a clear diagnostic screen. We'll cover the most common blink codes in the troubleshooting section below.
All Viking gate operator models are designed around UL 325, the safety standard for automatic gates and garage door operators. That standard defines how photo-eyes and obstruction sensing must behave. If someone has bypassed those safety features, expect unpredictable behavior and real danger.
Risk Factors: The Real Dangers of DIY Gate Repair

Image source: Bing (Web (fair-use with source credit))
A gate operator can hurt you badly. It's not a ceiling fan or a garage door opener. It moves hundreds of pounds of metal, and it often does so without warning.
Per UL 325, entrapment protection stops the gate when it touches something. If you're testing with your hands, or if you've disabled the photo-eyes, you've removed the only thing standing between you and serious injury.
High-voltage hazards
The transformer and control board operate on dangerous voltage levels. Even after unplugging, capacitors on the board can hold a charge for a minute or more. Touching them with a metal screwdriver can cause a nasty shock.
Always disconnect both the AC power and the battery before working inside the control box, then wait sixty seconds.
A solar panel keeps the system alive even when home power is off. Cover the panel or disconnect it during any repair.
The gate itself is a crush risk
Gates weigh 300 to 800 pounds depending on material and length. If a gate starts swinging toward you, there is no graceful way to stop it. Keep every body part clear of the path while testing.
Never put yourself between the gate and a fixed post. The pinch zone, where the moving gate edge meets a hinge or frame, is where fingers get lost. Work on the operator while the gate is closed and power is disconnected.
Manual release can be sneaky
Every Viking operator has a manual release lever to let you push the gate by hand. That release also removes the motor braking. Once released, the gate can move freely with gravity or wind.
If you release it on an incline without chocking, the gate can run away.
Use the release only when you're ready to move the gate yourself. Always re-engage it before restoring power.
Battery and chemical dangers
Sealed lead-acid batteries can leak or vent acid if damaged. Never tip one sideways, never pry at the terminals, and never jump-start the gate with a running car engine. Clean corrosion with baking soda and water.
Wear gloves. If the battery case is swollen or cracked, replace it immediately.
Step-by-Step Troubleshooting by Symptom
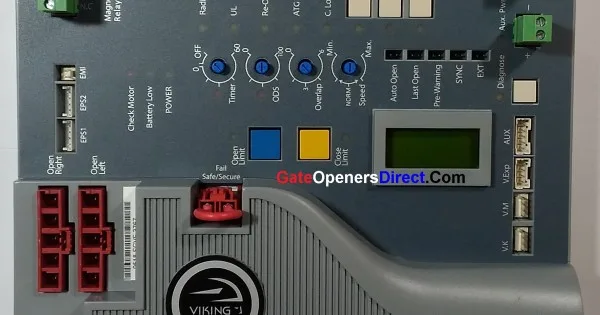
Image source: Bing (Web (fair-use with source credit))
Run this quick baseline check every time before diving into symptoms. It rules out the most common culprits and takes about three minutes.
- Confirm the operator has AC power at the wall outlet.
- Measure the battery voltage with a multimeter. It should read above 12.0 volts at rest.
- Look at the photo-eyes on both sides of the gate. The LEDs should be solid, not blinking.
- Count the LED blinks on the control board. Write that number down.
- Listen for an audible click when you hit an open or close command.
Then match the symptom below to the fix that fits.
Gate Won't Move at All
If the gate is dead silent when you press the remote, work backward from the battery. Check the battery terminals for corrosion and ensure the connectors are tight. A loose ground can kill everything.
Measure the voltage across the battery terminals. If it's below 11.5 volts, the battery is either discharged or dead. Charge it for a few hours and retest.
If the gate works on battery power after charging, the issue is likely in the transformer or the charging circuit.
If the battery is fine but the board isn't clicking, test the transformer. You should read low-voltage DC at its output terminals, usually around 12 to 24 volts. No output means a bad transformer.
In our research, this is the number one reason a Viking operator goes totally silent.
Gate Stops Mid-Cycle or Reverses
This one is almost always a fake obstruction signal. The gate starts moving, then reverses as if it hit something. In most cases, nothing touched the gate.
Start with the photo-eyes. Clean the lenses with a soft cloth and make sure the sun isn't glaring directly into one. Misaligned photo-eyes trigger the anti-entrapment system and reverse the gate.
The control board's LED will often blink a photo-eye error code in this situation.
Check the limit switches. If they're mechanically loose, they can bounce and tell the board the gate has reached its limit early. Tighten their brackets and verify the alignment marks.
Check the actual travel path. Grass, gravel, snow, or a warped gate panel can bind against the ground. The obstruction sensor amplifies that resistance and kills the cycle.
Remote Control Won't Work
This is common, and it's rarely the gate's fault. First, replace the remote's battery. A remote can look fine and still have too low a signal to reach the receiver.
Check the receiver's antenna location. Metal gates and buildings can block it. Keep the antenna clear of metal and as close to vertical as possible.
If the remote still does nothing, look at the control board's learn button. A power surge or battery drain can erase the memory. Press the learn button, then press the remote button within fifteen seconds.
If the LED confirms the code, you're done.
If the remote works some of the time but not others, the problem is likely a weak remote battery or electromagnetic interference from a nearby transformer. Test by walking closer to the operator.
Battery Backup Fails Quickly
Viking gate operators are designed to run on battery power for days. If your battery dies overnight, you have a charging problem, not a battery problem.
Measure the charging voltage across the battery while the AC transformer is plugged in. It should be slightly above the resting battery voltage, usually around 13.5 to 14.5 volts. If you read exactly 12 volts or less, the charging circuit is dead.
If the charging voltage looks good, test the battery under load. A multimeter won't show this at rest. Many batteries look fine at 12.6 volts and drop to 2 volts the moment they're asked for current.
Many auto parts stores will load-test a 12-volt battery for free.
Inspect your solar panel if you have one. Bird droppings, leaves, and dirt can cut the output dramatically. Clean it quarterly and check the wiring for rodent damage.
Error Code Blink Patterns Decoded
Viking gate operator control boards speak through the LED. The exact pattern varies by model and firmware, but these are the most frequently reported patterns across the Viking line as of 2026:
| Number of blinks | Meaning | Likely fix |
|---|---|---|
| 1 | Limit switch not resting | Check limit switch alignment |
| 2 | Obstruction sensed | Inspect gate path, adjust sensitivity |
| 3 | Photo-eye fault | Clean and align photo-eyes |
| 4 | Motor overload | Check voltage, motor brushes, binding |
| 5 | Control board error | Reset power, replace board if persistent |
Count blinks carefully after a failure. Most boards pause between cycles. If you catch the pattern mid-blink, wait for the full repetition.
This single data point will send you to the right piece of hardware nine times out of ten.
If you see a pattern not on this list, consult the original manual for your specific model.
Safe Practices Every Owner Must Follow
You can fix most Viking gate operator issues at home. But mistakes can cause electrical shock, property damage, or entrapment injuries. Use these practices on every repair.
Power down with peace of mind
Unplug the AC transformer and disconnect the battery before you open the control box. Then wait sixty seconds. That gives the capacitors time to discharge.
Use a non-contact voltage tester to confirm zero energy at the board if you're nervous.
Never work on the operator with the gate in a partially open position. Pick a state where the gate is fully closed and blocked from moving. Use a wooden wedge or clamp if there's any chance it could shift.
Keep your tools honest
Use insulated screwdrivers and pliers rated for electrical work. Plain metal tools are a slip away from shorting a board. Work with one hand in your pocket when poking around live terminals to keep electricity from passing across your chest.
Wear rubber-soled shoes. Don't kneel on a wet driveway while working on electrical parts.
Test the manual release before you need it
Test the manual release twice a year, once in spring and once in fall. When you pull the release, the gate should disengage from the motor smoothly. If it's stiff, lubricate the pivot points with light oil and work it back and forth.
A seized manual release is a nightmare during a power outage.
Recheck entrapment protection after every repair
Photo-eyes, obstruction sensitivity, and limit switches exist under UL 325 to protect everyone around the gate. After any repair, run a simple test. Place a cardboard box in the gate's path and close the gate.
It should reverse on contact. Place a hand near the photo-eye beam and confirm the gate stops when the beam is blocked.
If either test fails, do not use the gate until it passes.
Keep children and pets away
A moving gate is not a toy. Kids climb gates, pets chase birds, and both can end up in the swing path. Keep remotes out of reach.
Never let anyone stand in the gate's travel zone while you're testing.
Know when manual mode is safe
If you release the gate to move it manually, keep it on level ground or use a block to prevent roll. Once you're done, re-engage the release before restoring power. Running the motor with the release still disengaged can damage the gears.
Common Mistakes That Make Things Worse
These errors show up constantly in user reports. Avoid them and you'll save yourself hours of frustration.
Replacing parts without testing first
Throwing a new control board at a dead gate is the most expensive way to learn troubleshooting. Test the battery, transformer, and limit switches before buying anything. Most part vendors will not accept returns after installation.
Ignoring the battery
A bad battery messes with everything. It can cause random shutdowns, phantom error codes, and intermittent operation. Always start with the battery health check.
Skipping the photo-eye alignment
Dirty or misaligned photo-eyes are the leading cause of gates that stop mid-cycle. A quick wipe and a twist of the bracket fix most cases. Don't assume they're fine because they look clean.
Over-tightening limit switches
Limit switches need to be snug but not crushed. Over-tightening can crack the plastic bracket or distort the switch mechanism, causing the exact failure you're trying to fix.
Leaving the manual release disengaged
Some owners forget to re-engage the release after moving the gate manually. The next time they hit the remote, the motor spins freely and the gate doesn't move. Always click the release back into place.
Seasonal Maintenance That Prevents Most Problems
A little maintenance twice a year stops most of the common issues before they start.
Spring maintenance
- Clean and inspect photo-eye lenses.
- Test the battery voltage. Replace if below 12.0 volts at rest.
- Lubricate gate hinges and operator pivot points with light oil.
- Check for rodent damage to wiring under the control box.
- Test the manual release mechanism.
Fall maintenance
- Clear leaves and debris from the gate track and operator area.
- Tighten all mounting bolts on the operator and gate brackets.
- Inspect the battery terminals for corrosion.
- Test photo-eye alignment as daylight hours shorten.
- Run the obstruction test with a cardboard box.
Winter considerations
Frozen ground can shift gate posts and throw off limit switch alignment. If your gate starts stopping early or binding in winter, check the posts first. Snow buildup in the gate path also triggers false obstructions.
Keep the track clear.
Battery tips for seasonal use
If you leave a vacation property for months, disconnect the battery and store it indoors. Trickle charge it every six weeks. A battery that sits dead through winter will sulfate and fail by spring.
Real-World Scenarios (and What Fixed Them)
These stories come from actual user reports and technician notes. They show how the troubleshooting flow plays out in real life.
The case of the phantom reverse
A homeowner reported that their Viking swing gate would open fine but reverse violently when closing. The photo-eye LEDs looked solid. After cleaning the lenses anyway, the problem persisted.
The fix involved checking the limit switches. The close-limit bracket had shifted a half-inch from ground settling. Adjusting it back to alignment solved the issue immediately.
The remote that worked from the house but not the car
This one turned out to be a dying remote battery. The remote worked fine indoors near the receiver but failed from the car across the driveway. A fresh battery restored full range.
The owner had assumed the problem was a faulty receiver.
The gate that stopped in summer but worked in winter
A slide gate started overheating its motor during July. The motor thermal protection would trip after three cycles. The fix involved cleaning the gate track of accumulated gravel and dirt that added friction.
The gate was working harder than it should, and the motor was doing exactly what it was designed to do. The owner fixed it with a broom and a garden hose.
The silent failure after a power outage
A storm knocked out power for two days. When power returned, the gate was dead. The owner assumed lightning damage.
The actual cause was a battery that had drained during the outage and never recharged because the transformer's internal fuse blew. Replacing the fuse and charging the battery restored full function.
When to Call a Pro (and When You Really Shouldn't)
Most Viking gate operator issues are DIY-friendly. But some situations call for a licensed technician.
DIY-friendly situations
- Dead or weak battery
- Dirty photo-eye lenses
- Loose limit switch bracket
- Tripped breaker or blown fuse
- Remote battery replacement or reprogramming
- Seasonal cleaning and lubrication
Call a pro for these
- Burnt control board with visible damage or smell
- Motor that won't turn even with correct voltage
- Broken or stripped gears inside the operator
- Recurring power supply failures
- Gate that binds despite limit switch adjustment
- Any issue involving buried wiring or conduit
How to choose a technician
Look for someone who works specifically with automatic gate operators, not a general handyman. Ask if they're familiar with Viking models and UL 325 requirements. A good tech will ask about blink codes and battery voltage before scheduling a visit.
If they show up without asking anything, they may not be the right person.
Frequently Asked Questions
Why does my Viking gate stop and reverse for no reason?
This is almost always a photo-eye issue. Clean the lenses with a soft cloth and check the alignment. If the LEDs are blinking instead of solid, the beam is broken or misaligned.
Adjust the brackets until both LEDs are steady.
How do I reset my Viking gate operator?
Unplug the transformer and disconnect the battery. Wait sixty seconds. Reconnect the battery first, then plug the transformer back in.
The control board will reboot and the error code should clear. You may need to reprogram remotes after a full reset.
What does a blinking LED on my control board mean?
Count the blinks and refer to the pattern table above. One blink is usually a limit switch issue. Two blinks mean an obstruction signal.
Three blinks point to the photo-eyes. The board pauses between cycles, so watch for a full repetition.
Can I replace the battery myself?
Yes. Disconnect the AC power and remove the battery cable clips. Note the polarity before swapping.
Use a sealed lead-acid battery with the same voltage and amp-hour rating as the original. Dispose of the old battery at a recycling center.
How long does a Viking gate operator battery last?
Two to four years in normal use. High heat, deep discharges, and long periods of disuse shorten the lifespan. Test the battery voltage twice a year and replace it when it drops below 12.0 volts at rest.
Why does my gate work on battery but not on AC power?
The transformer has likely failed. Test its output terminals with a multimeter. You should read 12 to 24 volts DC.
No output means a dead transformer. Replacement transformers are available from Viking dealers and cost less than a service call.

Similar Posts