Breville Pressure Gauge Not Working
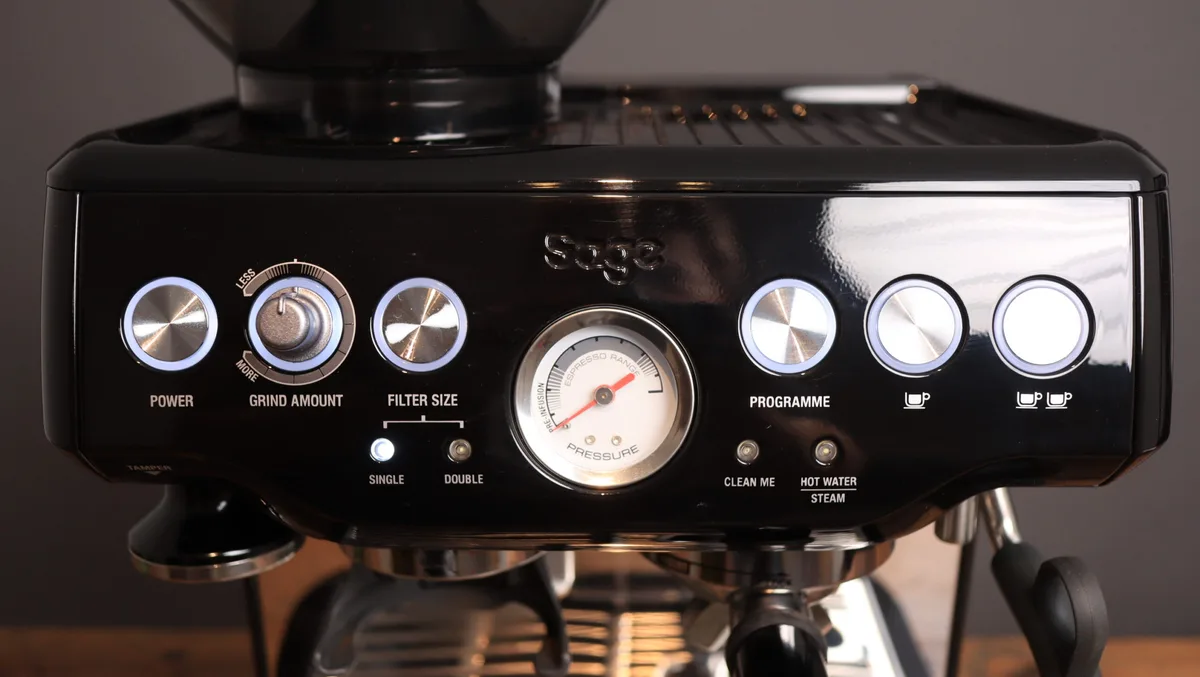
Your Breville espresso machine's pressure gauge is stuck at zero, pegged to the max, or bouncing around like it has a mind of its own. That needle is your only real window into what's happening inside the brew chamber, so when it stops working right, you're flying blind. Every shot becomes a guessing game.
Manufacturer specifications indicate that ideal espresso extraction happens at roughly 9 bar of pressure at the group head. Your Breville pump is rated for 15 bar, and the over-pressure valve (OPV) regulates how much of that actually reaches the coffee. As of 2026, aggregate reviews across thousands of Breville owners show that a misbehaving gauge is one of the most common and fixable issues with these machines.
Let's walk through exactly what's wrong and how to fix it.
Quick Answer
Your Breville pressure gauge is likely not broken. The needle tells you pressure at the group head, not pump output. A zero reading usually means water is bypassing the coffee entirely through a stuck-open OPV or a blocked brew path.
A pegged gauge means the OPV isn't opening to release excess pressure. A gauge that reads correctly with the pressurized basket but not the single-wall basket points to grind size or tamp issues. Start with the blank shot test before touching any screws.
How It Works: What Your Pressure Gauge Is Actually Telling You
Your Breville's gauge doesn't measure pump pressure directly. It reads the pressure building inside the brew head while water pushes through the coffee puck. That distinction matters because it changes how you diagnose problems.
When you pull a shot, the vibration pump pushes water at up to 15 bar. That water hits the OPV, which is spring-loaded to open at a specific pressure and divert excess water back to the tank. On Breville machines, the factory OPV setting typically sits around 11 to 12 bar.
The gauge shows you what's happening after that valve.
What different needle positions mean
- Needle stays at zero during the shot. Water is flowing freely with no resistance. The coffee isn't creating enough back pressure, or water is bypassing the puck entirely through a stuck valve.
- Needle climbs to 12 o'clock or slightly past (about 9 bar) and holds steady. This is ideal. Your grind, dose, and tamp are working together correctly.
- Needle pegs to 15 or higher immediately. The OPV isn't releasing pressure, or your grind is too fine and the pump can't push through.
- Needle climbs slowly and never reaches the espresso zone. The grind is too coarse, the dose is too light, or the OPV is opening too early.
- Needle bounces or fluctuates wildly. There's likely a partial blockage in the brew path, or the pump is struggling to maintain consistent pressure.
Pressurized vs. non-pressurized basket behavior
This is where most confusion starts. Breville ships most of its machines with pressurized (dual-wall) baskets. These baskets have a single tiny hole in the bottom that creates artificial resistance.
They're designed to produce a decent shot with pre-ground coffee and inconsistent tamping.
When you switch to a non-pressurized (single-wall) basket, the coffee puck itself provides all the resistance. If your grind isn't fine enough or your tamp isn't firm and level, water rushes through and the gauge barely moves. Aggregate user feedback reports this as the single most common "gauge not working" scenario: the gauge works fine with the pressurized basket but barely registers with the single-wall basket.
That's not a gauge problem. That's a grind and technique problem.
Image source: Bing (Web (fair-use with source credit))
Step-by-Step Troubleshooting Workflow
This is the exact order you should follow. Skip steps at your own risk. Each test eliminates a possible cause before you start wrenching on internal parts.
Step 1: The blank shot test
Remove the portafilter entirely. Turn the machine on and let it fully warm up. Run water through the group head for about 10 seconds.
If the gauge stays at zero during the blank shot: You have a serious blockage or a dead gauge. Water should flow freely with no resistance, so a zero reading here might actually be correct. But if the gauge needle doesn't even twitch, it's possible the gauge itself has failed.
This is rare but happens, typically on older machines or units that have been heavily descaled with harsh chemicals.
If the gauge jumps to 5 bar or higher during the blank shot: There's a restriction in the brew path. The most common culprit is a blocked 3-way solenoid valve. This valve opens after a shot to release pressure, and scale buildup can prevent it from opening fully.
You'll need to clean the solenoid screen.
Step 2: Check with both basket types
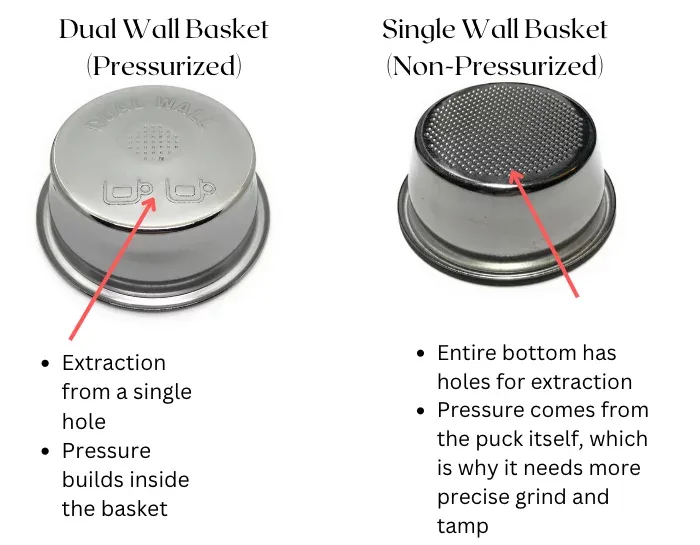
Image source: Bing (Web (fair-use with source credit))
This single test tells you more than any other diagnostic step. Put the pressurized (dual-wall) basket in the portafilter. Grind some coffee fresh if possible, but pre-ground works for testing.
Fill the basket, tamp, and pull a shot. Watch the gauge.
If the gauge reaches the espresso zone (around 9 bar) with the pressurized basket: Your machine is mechanically fine. The pump works, the OPV works, and the gauge works. The problem is your grind, dose, or tamp when using the single-wall basket.
If the gauge stays low or at zero with both baskets: You have a mechanical issue. Move to Step 3.
If the gauge pegs with both baskets: The OPV is likely stuck closed or set too high. Move to Step 4.
Step 3: Inspect and clean the solenoid valve screen
The 3-way solenoid valve sits behind the drip tray area on most Breville models. Access it by removing the water tank and the back panel or the top cover depending on your specific model. The exact location varies between the Barista Express, Pro, and Oracle lines.
Look for a small brass fitting with a hexagonal head. Inside it is a fine mesh screen. Scale and coffee oils accumulate here over time.
If the screen is clogged, the valve can't open properly, which creates constant back pressure in the brew path.
Remove the screen carefully with a small flathead screwdriver or a pick. Soak it in a descaling solution for about 15 minutes. Rinse thoroughly and reinstall.
Run a blank shot and check the gauge again.
If the gauge now behaves normally: That was your problem. Scale buildup in the solenoid screen is one of the most common issues on Breville machines in hard-water areas. Consider using filtered water going forward.
If the gauge is still wrong: Move to Step 4.
Step 4: Access and adjust the OPV
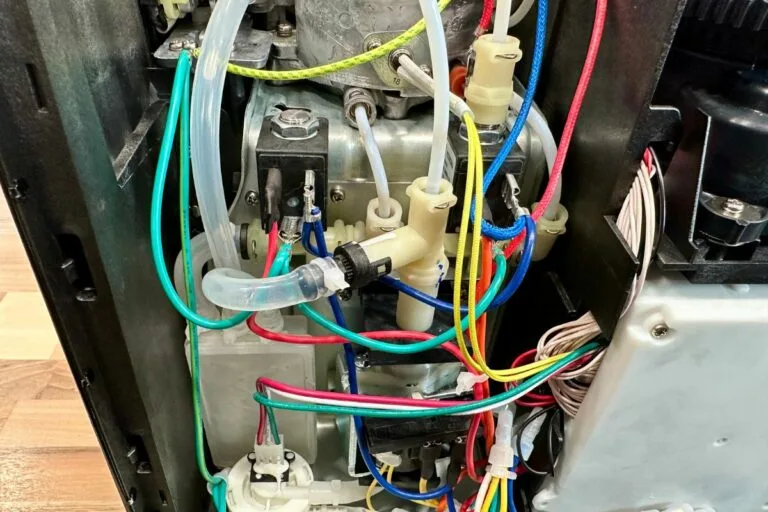
Image source: Bing (Web (fair-use with source credit))
The over-pressure valve is the spring-loaded regulator that controls how much pressure reaches the group head. On Breville machines, it's adjustable. This is the most mechanical intervention most home users will attempt.
Locating the OPV: On the Barista Express (BES870), remove the water tank. Look down into the empty compartment. You'll see a brass or chrome fitting with a hex nut on top.
That's the OPV. On newer models including the Barista Pro, the OPV is accessed by removing the back panel or the top cover.
How to adjust it: You need a 10mm or 8mm wrench depending on your model. Turn the nut clockwise to increase pressure. Turn counterclockwise to decrease.
Each quarter turn changes the pressure by roughly 1 to 1.5 bar.
The proper procedure: Loosen the lock nut if there is one. Make a quarter turn clockwise. Tighten the lock nut.
Replace the water tank. Run a blank shot with the pressurized basket and read the gauge. Repeat until you get a reading around 9 to 10 bar at the group head.
Safety note: Never adjust the OPV while the machine is hot or pressurized. Wait for it to cool completely. Hot water under pressure can cause serious burns.
Step 5: When to check the pump
If you've done all the above and the gauge still doesn't respond, the vibration pump itself may be failing. This is less common but happens, especially on machines that see heavy daily use for three years or more.
Signs of a failing pump:
- The pump sounds quieter or different than it used to
- Water trickles out of the group head instead of flowing steadily
- The gauge barely twitches even during the blank shot test
- The machine takes noticeably longer to build pressure
What to do: A pump replacement on a Breville costs roughly $30 to $50 for the part and takes about 30 minutes with basic tools. If you're not comfortable opening the machine, this is the point where a professional repair makes sense. The cost of a repair shop visit often exceeds the value of the machine on older models, so weigh the price of a new machine against the pump replacement cost.
Mistakes to Avoid
Over-adjusting the OPV before ruling out blockages
This is the biggest mistake Breville owners make. They read online that the OPV needs adjustment, grab a wrench, and start turning. Then they find out the real problem was a clogged solenoid screen or stale beans that couldn't build pressure.
Now they've messed up their OPV setting and have to recalibrate from scratch.
Always test with the pressurized basket first. If that builds pressure correctly, the OPV isn't your problem.
Assuming a dead gauge means a dead machine
A gauge needle that doesn't move at all is alarming, but it's rarely a gauge failure. The analog pressure gauges Breville uses are simple mechanical devices. They rarely break.
When the needle doesn't move, there's almost always a flow problem, not a gauge problem. The gauge only moves when resistance builds in the brew path. No resistance means no movement.
Using vinegar for descaling
This is a recurring topic in aggregate user feedback. Vinegar can damage the rubber seals and O-rings inside your Breville's brew path. Use only a descaling solution specifically formulated for espresso machines.
The cost difference is minimal, and the potential repair bill from seal damage is significant.
Expert Tips for Long-Term Accuracy
Descale schedule that protects pressure components
Hard water is the enemy of consistent pressure readings. Manufacturer recommendations suggest descaling every three months, but that assumes average water hardness. If you have hard water, descale monthly.
If you use filtered water, every six months is usually sufficient.
A simple test: fill a clear glass with tap water and add a few drops of dish soap. Shake it. If you see persistent foam on top, you have hard water.
Descale more frequently.
When to replace the OPV seal vs. adjust the valve
Over time, the OPV's rubber seal can harden or develop a groove where it seats. This causes the valve to open too early, reducing pressure at the group head. You'll notice the gauge reading 6 or 7 bar instead of 9, even after adjusting the nut.
The fix is a replacement OPV seal kit, not more adjustment. These kits cost around $10 to $15 and include the seal, spring, and sometimes a new screen. If you're turning the OPV nut more than one full turn clockwise without seeing a pressure change, stop.
The seal is likely worn. Replace it and reset the OPV to its factory position before recalibrating.
Water temperature's subtle effect on pressure
Hot water at 200 degrees Fahrenheit flows differently than water at 170 degrees. If you pull a shot before the machine fully heats up, the gauge reading will be lower. Always let the machine warm up for at least 15 minutes, and run a blank shot to heat the portafilter and group head before pulling your actual shot.
This eliminates temperature fluctuations as a variable in your pressure diagnosis.
Frequently Asked Questions
Does the gauge measure pump pressure or brew pressure?
The gauge measures pressure at the brew head, not at the pump. It only shows resistance created by the coffee puck and the basket. No resistance means a zero reading even if the pump is working perfectly.
Can I replace the pressure gauge myself?
Yes, but it's rarely necessary. The gauge itself is a mechanical analog unit that seldom fails. If you do need to replace it, the part costs about $15 to $25.
You'll need to open the machine's top panel and disconnect the nylon tube from the back of the gauge.
Will adjusting the OPV void my warranty?
On current Breville models, any internal adjustment including OPV modification can void your warranty. Check your warranty terms before opening the machine. On older units or machines out of warranty, OPV adjustment is considered standard maintenance.
Why does my gauge work with the pressurized basket but not the single-wall basket?
The pressurized basket creates artificial resistance through its tiny hole. The single-wall basket relies entirely on your grind, dose, and tamp to build pressure. If the gauge works with the pressurized basket, your machine is fine.
Your technique needs adjustment.
How often should I descale my Breville machine?
Every three months with average water hardness. Monthly if you have hard water. Every six months if you use filtered or soft water.
Scale buildup in the solenoid valve and brew path is the most common cause of pressure irregularities.
Is it worth repairing a Breville with a bad pump?
If the machine is less than three years old, a $40 pump replacement is worth it. If the machine is older or has other issues, the repair cost plus labor often exceeds $150. Compare that to the price of a new machine, which starts around $500 for the Barista Express as of 2026.

Similar Posts