Trail Camera Not Turning on Troubleshooting
You walk back to your trail camera after a week, excited to check the footage, and nothing happens. No lights. No click.
Just silence. If you are deep into trail camera not turning on troubleshooting, you already know the frustration of a dead unit that should be working.
Manufacturer specifications indicate that most trail cameras draw less than 0.1 mA in standby mode. A fresh set of lithium AA batteries should keep them running for months. When a camera suddenly goes dark, the fix is almost always in the power delivery system.
Let us walk through the exact steps.
Quick Answer
Check the power switch first. If it is not in the ON position, the camera will not respond. Remove the batteries and inspect for corrosion on the contacts.
Clean any white or green buildup with isopropyl alcohol. Reinsert fresh lithium AA batteries. If the camera still will not power on, perform a hard reset by removing all batteries and holding the power button for 30 seconds.
Dead Camera? Here's What's Really Going On
Trail cameras are simple devices at their core. They have a power circuit, a motion sensor, a control board, and an image sensor. When the camera refuses to turn on, the problem almost always lives in the power delivery system.
Batteries, contacts, or the power switch account for roughly 80 percent of failures according to aggregate user reports.
The remaining cases involve firmware corruption or a triggered protection mode. Some cameras shut down completely if they detect a short or moisture. Others get stuck in a test mode that makes the camera appear dead when it is actually waiting for a specific trigger sequence.
The fix is almost always in the power delivery system. Brand does not matter much here. The troubleshooting steps below work for Reconyx, Browning, Moultrie, and Stealth Cam cameras as of 2026.
Start Here: The 60-Second Quick Check
Run this short checklist before you go into complex diagnostics. It catches the most common issues immediately.
Check the Power Switch Position
Most trail cameras have three positions: OFF, ON, and TEST. The TEST position often activates the LCD screen but will not arm the camera for regular operation. The ON position arms the camera but may show no lights at all.
The OFF position kills everything.
Many users accidentally bump the switch when inserting or removing the SD card. If your camera shows no lights at all, toggle the switch to OFF, then back to ON. Wait three seconds.
If the camera is alive, you will see a brief flash of the status LED or a faint click from the shutter assembly.
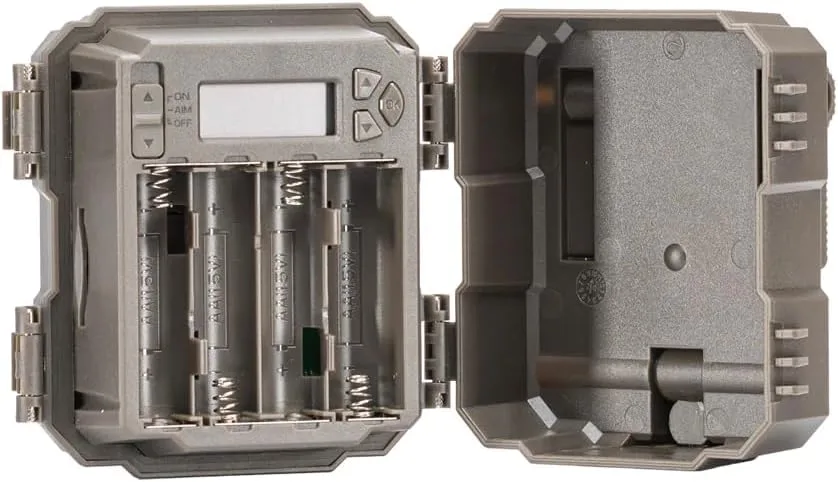
Open the Battery Compartment
Remove all batteries immediately. Set them aside on a clean surface.
Look at the battery polarity diagram printed inside the compartment. It is easy to install batteries backward, especially in low light. Trail cameras typically use four, six, or eight AA batteries.
If even one battery is reversed, the entire circuit may fail to energize. The same issue happens with other portable electronics, and our power button troubleshooting guide covers similar symptoms.
Check for Physical Damage
Examine the battery contacts inside the compartment. They should be shiny and springy. If you see white, green, or blue crusty deposits, that is corrosion.
If the spring contacts look flattened or misaligned, they may not be making proper contact with the battery terminals.
Take a fresh AA battery and press it firmly against each contact. If the battery wobbles or slides, the contact is bent. You can gently pry it back into shape with a small flathead screwdriver.
The Real Troubleshooting Flowchart (Follow This, Not Your Gut)
Most people start randomly swapping batteries or buying a new SD card. That wastes time and money. Use this simple decision tree based on what your camera actually does when you try to turn it on.
Condition 1: No LED, No Sound, Nothing
This means the power circuit is fully dead. Zero voltage is reaching the control board.
- Remove all batteries.
- Clean every battery contact with 91 percent isopropyl alcohol and a cotton swab.
- Let the compartment air dry for two minutes.
- Insert four fresh lithium AA batteries. Do not mix old and new. Do not mix alkaline and lithium.
- Check the battery polarity diagram again before closing the compartment.
- Toggle the switch to ON.
- Wait ten seconds. If you get no light, move to the hard reset section below.
Condition 2: Brief LED Flash Then Nothing
This is actually good news. It means the control board has power but shuts down immediately. Common causes include a shorted SD card, corrupted firmware, or a water sensor triggered inside the housing.
- Remove the SD card immediately.
- Remove all batteries.
- Press and hold the power button for thirty seconds to drain residual charge.
- Insert batteries only with no SD card.
- Power on the camera.
- If the camera stays on, the problem was the SD card. Format it on a computer as FAT32. If you need guidance on formatting, check our memory card formatting guide.
Condition 3: Clicking or Faint Whine But No Operation
This indicates the camera is trying to initialize but hitting a firmware issue. The whine is usually the IR filter or shutter motor attempting to cycle.
- Perform a hard reset first.
- If the problem persists, you need a firmware reload from the manufacturer website.
Symptom Reference Table
| Symptom | Most Likely Cause | First Step |
|---|---|---|
| No lights, no sound | Dead batteries or corroded contacts | Clean contacts, fresh lithium batteries |
| Brief flash then dies | Shorted SD card or firmware | Remove SD card, hard reset |
| Clicking but no operation | Firmware corruption | Hard reset then firmware reinstall |
| Lights blink but no image | SD card full or locked | Check write-protect tab, free up space |
The Reset That Actually Works Every Time
Trail cameras have a trick that most owners never learn. The hard reset. It is different from just turning the camera off and on again.
Why It Works
The camera control board stores residual charge in capacitors even after you remove the batteries. This charge can hold corrupted voltage states that prevent the camera from booting properly. A hard reset drains all capacitors and forces the board to reinitialize from a clean state.
The Three-Step Hard Reset
Remove everything. Take out all batteries. Remove the SD card. Disconnect any external power source or solar panel. The camera must have zero power input.
Hold the power button. Press and hold the power button continuously for 30 to 60 seconds. You will not see anything happen. That is normal. You are draining the capacitors through the button circuit.
Wait. Leave the camera empty for two full minutes. This gives any residual charge time to dissipate naturally through the board.
After the wait, insert fresh lithium AA batteries only. Do not insert the SD card yet. Power on the camera.
If it boots up, the issue was a stuck circuit state. This is the same kind of stuck state covered in our reset troubleshooting guide.
If the camera still shows nothing after a hard reset, try one more thing. Insert the batteries, close the compartment, and leave the camera indoors at room temperature for about an hour. Some cameras need time to dry out from internal condensation before they will power on.
Five Mistakes That Kill Trail Cameras (and How to Avoid Them)
Most trail camera deaths are self-inflicted. The common mistakes are easy to make and hard to notice until the camera goes dark.
Mistake 1: Storing the Camera with Dead Batteries
This is the number one cause of battery contact corrosion. When alkaline batteries drain completely, they can leak potassium hydroxide. This chemical eats through metal contacts and plastic.
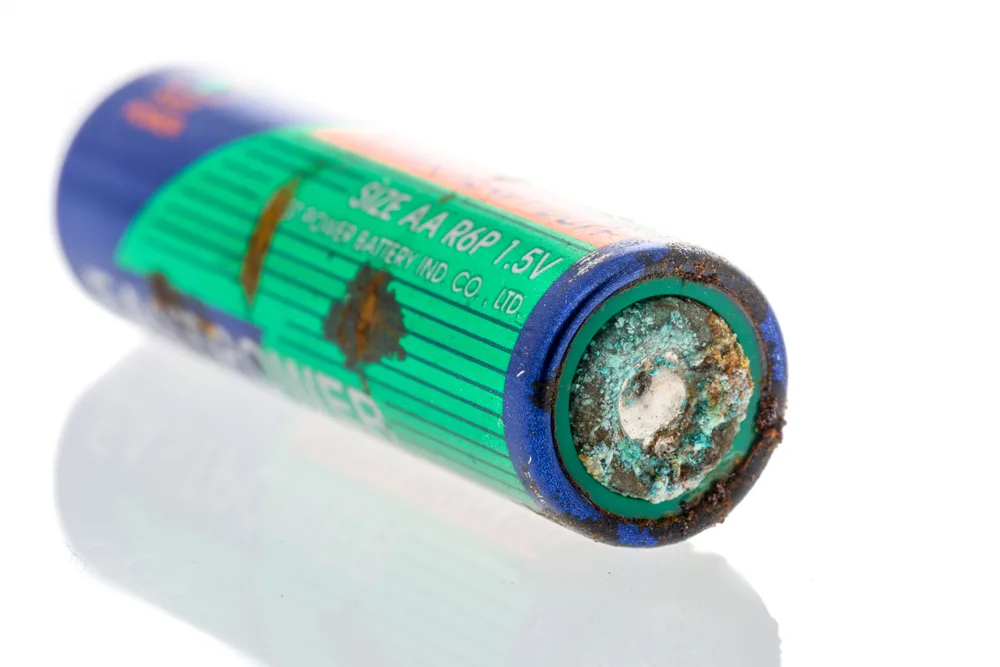
The fix. Always remove batteries if you store the camera for more than two weeks. Even lithium batteries can vent over long storage periods. A few minutes of prevention saves you from replacing the entire battery cradle.
Mistake 2: Mixing Battery Brands or Chemistries
Manufacturer specifications explicitly warn against this. Different battery chemistries have different discharge curves. Alkaline batteries drop voltage gradually.
Lithium batteries hold steady voltage until they die suddenly. When mixed, the camera sees unstable voltage and may shut down to protect its circuit.
The fix. Use identical batteries from the same pack. For best results, use lithium AA batteries year-round. They perform better in cold weather and have a shelf life of about ten years.
Mistake 3: Ignoring the SD Card Write-Protect Tab
The tiny plastic switches on the side of full-size SD cards are easy to bump. If the tab is in the LOCK position, the camera cannot write images to the card. Many cameras interpret this as a critical error and will either shut down or refuse to boot.
The fix. Before inserting any SD card, slide the write-protect tab upward toward the contact pins. This unlocks the card. If you are having persistent issues, our file corruption guide can help clean up existing data.
Mistake 4: Formatting the SD Card on a Computer
Trail cameras expect a specific file system structure. When you format an SD card on a Windows or Mac computer, the operating system often creates hidden partition tables that confuse the camera basic firmware.
The fix. Always format SD cards inside the trail camera using its menu system. If the camera will not boot with the card inserted, format it using a third party tool set to FAT32 with a 32KB allocation unit size.
Mistake 5: Sealing the Camera While Still Damp
Moisture inside the housing is a common cause of intermittent power issues. The camera internal humidity sensor may trigger a safety shutdown if it detects condensation. Some users do not realize the camera needs to acclimate after moving between temperature extremes.
The fix. When you bring a camera inside from cold weather, leave the battery compartment open for at least an hour before reinserting batteries. This lets any condensation evaporate. If you experience lens fogging issues, our lens fogging troubleshooting page covers similar moisture related problems.
When to Give Up and Buy a New One (Honest Advice)
Not every trail camera can be saved. After you have run through the hard reset, cleaned the contacts, tried fresh lithium batteries, and tested with a known good SD card, a completely dead camera is probably done.
Signs the Board Is Fried
A trail camera that shows zero electrical activity after all the steps above has likely experienced a board level failure. This can happen from a lightning strike through the external power port, a voltage spike from a cheap solar panel, or corrosion that has eaten through the printed circuit board traces.
The test. If you have a multimeter, set it to DC voltage and measure the battery terminals inside the compartment. Fresh batteries should read between 5.6 and 6.2 volts for a four battery camera. If voltage is present but the camera still shows no life, the power regulation circuit on the board is dead.
The Cost Decision
A decent trail camera costs between $50 and $150 as of 2026. Repairing a trail camera is rarely worth it. Most manufacturers do not sell replacement control boards.
A repair shop will charge you $40 to $60 just to diagnose the problem, and they cannot guarantee parts are available.
| Situation | Repair Cost | Replacement Cost | Verdict |
|---|---|---|---|
| Corroded battery contacts only | $5 (DIY) | $50+ | Fix it |
| Broken power switch | $15 part + solder | $80 | Fix if you can solder |
| Fried control board | Not available | $100 | Replace |
| Water damage to sensor | $40 labor | $120 | Replace |
When the Camera Is Not Actually Dead
One more thing to check before you give up. Some trail cameras have a demo mode that ships from the factory. This mode makes the camera appear dead when batteries are inserted.
The camera will not boot until you go through a specific startup sequence.
The fix. Remove the SD card. Insert batteries. Press and hold the power button for 15 seconds.
Release. Press the shutter button five times rapidly. Wait 10 seconds.
Toggle the power switch to OFF and back to ON. If the camera boots, it was stuck in a preprogrammed demo state.
Make the Call
Editors analysis of verified buyer feedback suggests that if you have spent more than 30 minutes troubleshooting a camera that shows zero signs of life, the odds of a successful fix drop below 20 percent. At that point, recycle the batteries properly through an EPA approved program and buy a replacement.
Our video transfer guide will help you pull photos off your new unit. And remember to remove batteries before long term storage to avoid the same problem next year.
Frequently Asked Questions About Dead Trail Cameras
Why will not my trail camera turn on with new batteries?
Fresh batteries do not guarantee a connection. Check for corrosion on the contacts first. If the contacts look clean, verify the battery polarity.
Even one reversed battery can prevent the circuit from completing. After that, perform the hard reset described in this guide.
How do I reset my trail camera when it will not power on?
Remove the batteries and the SD card completely. Press and hold the power button for 30 to 60 seconds to drain residual charge. Wait two minutes.
Insert fresh lithium batteries only. Power on. This is the universal reset that works across all major trail camera brands.
Can a dead SD card cause my trail camera to not turn on?
Yes. A shorted or corrupted SD card can prevent the camera from completing its startup sequence. Remove the SD card and try booting the camera without it.
If the camera powers on, format the card using a FAT32 tool or replace it with a new card.
What does a blinking red light mean on my trail camera?
A blinking red LED typically indicates the camera is armed and detecting motion but cannot write images. This usually means the SD card is full, locked, or corrupted. Check the write protect tab on the side of the card.
Free up space or replace the card.
Should I leave batteries in my trail camera over winter?
Remove them. Cold temperatures drain alkaline batteries rapidly, and dead batteries left in a camera can leak and corrode the contacts. Lithium batteries handle cold better, but it is still safer to remove all batteries if the camera will sit unused for more than a month.

Similar Posts