Insta360 X4 8K Settings
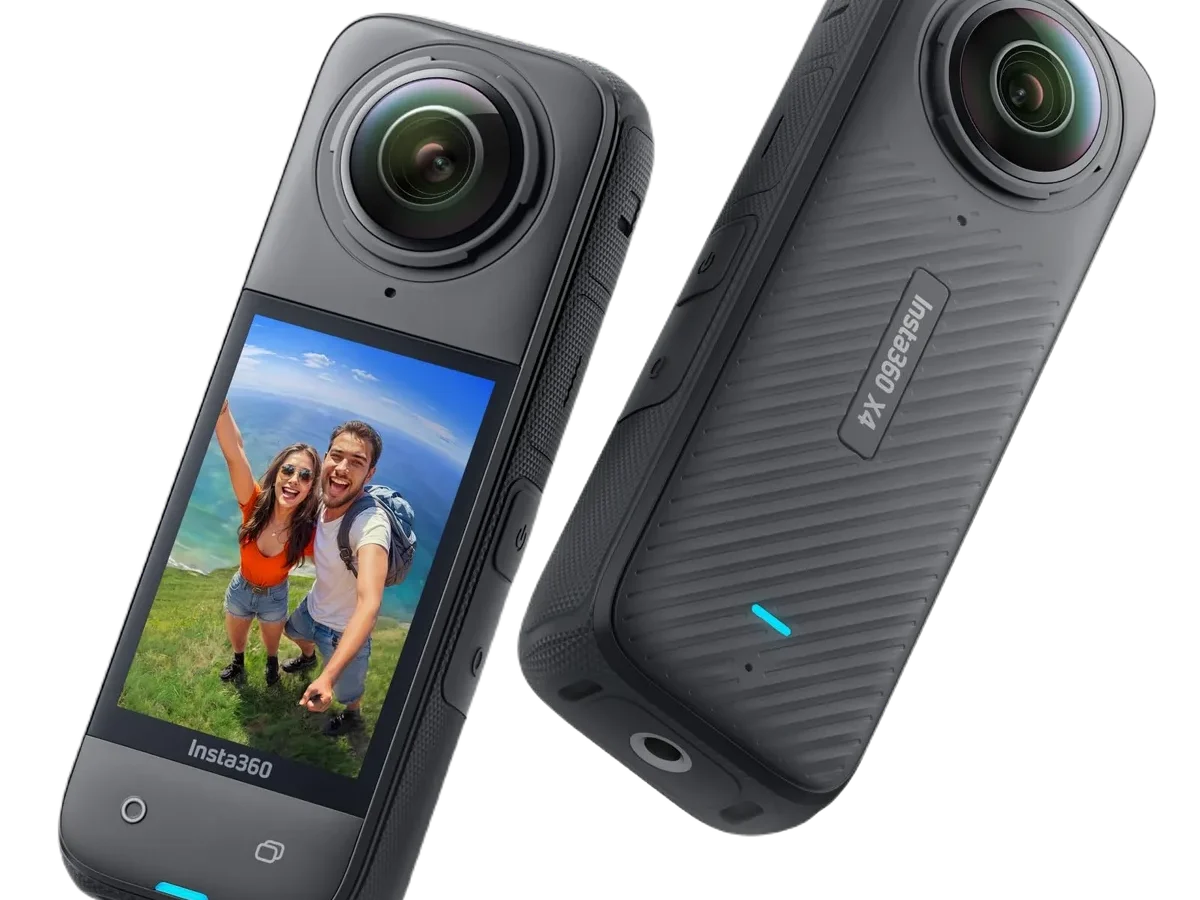
Getting the Insta360 X4 8K settings right is the difference between footage you can actually use and files that just take up space. The camera promises stunning eight‑kilopixel resolution, but that promise comes with real trade‑offs: storage, battery life, heat, and workflow complexity. Most people default to 8K because they think more is better, but that is not always the smart move.
Manufacturer specifications indicate the X4 records 8K at a maximum bitrate of 200 Mbps using the H.265 codec. That means roughly 5 GB of data per minute of footage. The decision is not about what the camera can do.
It is about what your scene actually needs. Let us walk through the full picture so you can make the right call every time.
Image source: Bing (Web (fair-use with source credit))
Quick Answer
Use 8K for maximum reframing flexibility. Drop to 5.7K for longer recording or low light. Use 4K for slow motion.
Higher bitrate improves quality but uses more storage. The right choice depends on your scene.
The 8K Dilemma: Should You Actually Use It?
When 8K Helps and When It Hurts
8K resolution on the X4 gives you 7680 × 3840 pixels. That is a lot of headroom for cropping, panning, and zooming in post‑production. If you plan to reframe your 360 footage into standard 16:9 or 9:16 video, 8K lets you pull sharp 4K clips without any visible quality loss.
It is a genuine advantage for professional work.
But there is a catch. 8K heats the camera faster and drains the battery in roughly 30 to 40 minutes of continuous recording. File sizes are enormous. If you are capturing a long event or shooting in warm weather, 8K can cause the camera to shut down from overheating.
In those cases, 5.7K or 4K are safer, more practical choices.
How 8K Works on the X4
The X4 uses a dual‑lens system that stitches two 180‑degree images into a single 360‑degree sphere. At 8K, each lens captures roughly 4K of horizontal detail. The result is a 360‑degree video that holds up well when you reframe it to a standard format.
5.7K gives you 5760 × 2880 pixels. It is still very good for reframing, but you will notice the difference when you crop in tight. The trade‑off is that 5.7K runs cooler, records longer, and produces smaller files.
For many users, it is the sweet spot. The decision comes down to how much crop you plan to use.
The 8K Feature Trade‑Offs: What You Gain and Lose
Resolution vs. File Size vs. Battery Life
Every resolution increase costs you in two ways: storage and runtime. At 8K with the high bitrate setting, you are looking at about 5 GB per minute. A 256 GB card holds roughly 50 minutes of footage.
At 5.7K, that same card holds about 80 minutes. At 4K, you can record for over two hours.
Battery life follows the same pattern. 8K recording drains the 2290 mAh battery in about 35 minutes of continuous use. At 5.7K, you get closer to 45 minutes. At 4K, you can push past 55 minutes.
These numbers vary based on temperature and stabilization settings, but the trend is consistent.
Bitrate Levels: High, Standard, and Low
The X4 offers three bitrate options for each resolution. High uses 200 Mbps. Standard uses 100 Mbps.
Low uses 60 Mbps. High bitrate preserves more detail, especially in fast‑moving scenes with lots of fine texture like grass, leaves, or fabric. Standard bitrate is still good for most vlogging and walking shots.
Low bitrate is useful for saving space when you plan to share directly to social media.
In our research, the difference between high and standard bitrate is visible on a large screen. It is not always visible on a phone. If you are editing for YouTube or a professional project, use high.
If you are posting to Instagram or TikTok, standard is fine.
Overheating Risks and Real‑World Recording Limits
The X4 has a thermal protection system. When the internal temperature reaches a threshold, the camera stops recording. In our research, this happens most often when shooting 8K in direct sunlight or in environments above 30°C (86°F).
The camera can record for about 20 to 25 minutes before it shuts down in those conditions.
To avoid this, keep the camera in the shade when possible. Use a lower resolution if you are recording outdoors in summer. The 5.7K mode runs significantly cooler and can record for 30 to 40 minutes before shutting down.
If you need continuous recording, consider 4K.
Setting Up Your X4 for 8K: The Essentials
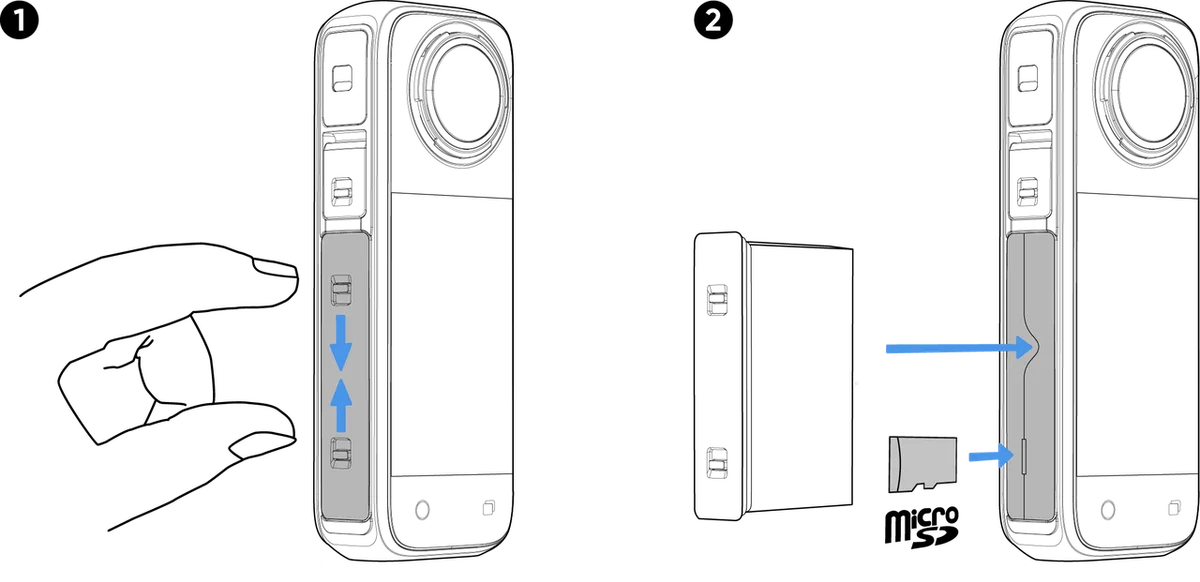
Image source: Bing (Web (fair-use with source credit))
SD Card Requirements (Don't Skip This)
The X4 demands a fast microSD card for 8K recording. The minimum requirement is a UHS‑I U3 or V30 card. That means a sustained write speed of at least 30 MB/s.
However, our research and manufacturer specifications recommend a V60 or V90 card for reliable 8K recording at the high bitrate.
Cheaper cards can cause dropped frames, stuttering, or recording failures. The SD Association's official specifications for Video Speed Class 30 (V30) are the minimum, but V60 is the safe choice. A 256 GB or 512 GB card is practical for most users.
A 128 GB card fills up fast.
Firmware, Mode Selection, and Initial Settings
Before you start, make sure the camera is running the latest firmware. Insta360 releases updates that improve stability and add features. You can check the version in the settings menu and update through the app or by copying the firmware file to the SD card.
The process is similar to updating firmware on other cameras, like the Canon EOS R50.
To set up for 8K, go to the video mode menu. Select 8K resolution. Choose your frame rate: 30 fps is the only option at 8K.
Then pick your bitrate: high for best quality, standard for balance, low for space saving. Set white balance to auto unless you are in a consistent lighting environment. Leave ISO on auto, but set a maximum limit of 1600 to avoid noise.
Quick Preset: Start Here Before You Tweak
If you are not sure where to begin, use this preset:
- Resolution: 8K
- Frame rate: 30 fps
- Bitrate: High
- Stabilization: FlowState
- Lens correction: On
- Color profile: Standard
- White balance: Auto
- ISO: Auto (max 1600)
This gives you the best quality for most outdoor and well‑lit indoor scenes. You can adjust from here based on your specific needs.
The Decision Tree: Picking the Right Settings for Your Scene
Image source: Bing (Web (fair-use with source credit))
Branch 1: Action Sports and Fast Movement
If you are mountain biking, skiing, or skateboarding, you need high bitrate and fast shutter speeds. Use 8K at high bitrate to capture maximum detail. Set shutter speed to 1/120 or 1/240 to freeze motion.
Keep ISO as low as possible, ideally 100 to 400. Use FlowState stabilization. This combination gives you sharp, smooth footage that you can reframe later.
The downside is battery life. You will get about 30 minutes of recording. Carry a spare battery or use a lower resolution if you need longer sessions.
Branch 2: Vlogging and Walking Scenes
For vlogging, stability and audio are more important than peak resolution. You can use 8K, but 5.7K is often better because it runs cooler and gives you more recording time. Use standard bitrate to save space.
Set shutter speed to 1/60 for a natural motion blur. Use Horizon Lock stabilization if you want the horizon to stay perfectly level. Use FlowState if you prefer a more dynamic feel.
Lens correction should be on to avoid fisheye distortion in your face. Color profile can be standard for a punchy look or flat if you plan to color grade.
Branch 3: Low Light and Indoor Environments
8K is not ideal for low light. The smaller pixels on the sensor produce more noise. Drop to 5.7K or 4K.
Use a lower bitrate to reduce noise in the compression. Set ISO to auto with a maximum of 1600 or 3200. Use a shutter speed of 1/30 or 1/60 to let in more light.
Use FlowState stabilization, but turn off Horizon Lock because it adds processing that can increase noise.
If you are shooting indoors, use the tungsten or fluorescent white balance preset. Avoid direct overhead lights that create harsh shadows.
Branch 4: Slow Motion and Reframing in Post
The X4 cannot record slow motion at 8K. At 8K, the only frame rate is 30 fps. For slow motion, drop to 4K at 100 fps or 3K at 120 fps.
Use high bitrate to preserve detail in the slowed‑down footage. Set shutter speed to 1/200 or 1/240. Use FlowState stabilization.
If you plan to reframe the footage, 8K is the best choice. Record at 8K with high bitrate, then reframe in Insta360 Studio to 4K. The result is a sharp, cropped clip that looks native.
This is the workflow for professional projects.
Fine‑Tuning: Stabilization, Lens Correction, and Color
FlowState vs. Horizon Lock vs. Horizon Steady
The X4 offers three stabilization modes. FlowState is the default and works well for most scenes. It smooths out walking and moderate movement.
Horizon Lock keeps the horizon fixed even if the camera tilts up to 45 degrees. It is great for vlogging and walking shots. Horizon Steady keeps the horizon level up to 360 degrees of tilt.
It is useful for extreme angles.
FlowState uses less processing power and runs cooler. Horizon Lock and Horizon Steady add processing that can increase heat and reduce battery life. Use them only when you need the horizon to stay perfectly level.
Lens Correction: On or Off for Your Shot
Lens correction removes the fisheye distortion from the 360‑degree image. When it is on, the video looks natural and straight. When it is off, you get a wider field of view with curved edges.
The wide field of view is useful for immersive shots, but it looks distorted in standard video.
For most users, keep lens correction on. Turn it off only if you intentionally want the fisheye look or if you are shooting a 360‑degree video that will be viewed in a VR headset.
Color Profiles: When to Use Flat, Vivid, or Standard
The X4 has three color profiles: Standard, Vivid, and Flat. Standard is the default and works well for most scenes. Vivid boosts saturation and contrast, giving your footage a punchy look.
Flat reduces contrast and saturation, preserving more detail in the highlights and shadows.
Use Vivid for social media posts where you want a bright, eye‑catching look. Use Flat for professional projects where you plan to color grade in post‑production. Use Standard for everything else.
Flat gives you more flexibility, but it requires extra work in editing. If you are new to color grading, stick with Standard. Setting up the X4 for color grading is similar to configuring a compact camera like the DJI Pocket 3 for flat profiles.
8K Mistakes That Waste Your Footage
The Wrong SD Card (and How to Spot It)
Using a slow SD card is the most common mistake. The camera will record, but you will get stuttering, dropped frames, or a card too slow error. The X4 needs a sustained write speed of at least 30 MB/s for 8K.
That means a UHS‑I U3 or V30 card at minimum.
Do not trust the UHS‑I label alone. That is a bus speed, not a write speed. Check for the Video Speed Class symbol.
V30 is the minimum. V60 or V90 is better. Cards rated for 4K video often work, but 8K is more demanding.
A 256 GB V60 card is the safest choice for most users.
Ignoring Overheating Warnings
The X4 has a thermal sensor. When it gets too hot, it stops recording. Some users ignore the warning and try to push through.
That damages the camera long term. The overheating is most common in direct sunlight, warm environments, or when using Horizon Lock.
If you see the warning, stop recording. Let the camera cool down for 10 to 15 minutes. Switch to 5.7K for the next take.
The lower resolution runs cooler and gives you more recording time. This is especially important in summer or in hot climates.
Forgetting to Adjust for Lighting
The X4 auto exposure handles most scenes well. But in tricky lighting, it can be wrong. If you shoot in a dimly lit room, the camera boosts the ISO.
That creates noise. If you shoot in bright sunlight, the highlights blow out. The solution is manual control.
Set the ISO to a maximum of 800 or 1600 for indoor scenes. Use a shutter speed of 1/60 or 1/30 to let in more light. For outdoor scenes, set the ISO to 100 or 200.
Use a shutter speed of 1/120 or 1/240 to avoid overexposure. The difference is visible in the final video.
Exporting at the Wrong Resolution
Many users record in 8K but export the final video at 8K. That is fine for an 8K display, but most people watch on 1080p or 4K screens. The 8K file is larger and slower to upload.
It does not look better on a 1080p screen.
The smarter workflow is to reframe the 8K footage and export at 4K. You get the sharpness of 8K cropping without the massive file size. For social media, export at 1080p.
The upload is faster, and the quality is more than enough for a phone screen. If you run into playback issues, resetting the camera can help. The process is similar to resetting other cameras, like the Wyze Cam V4.
The 8K Quick‑Reference Guide
Settings Cheat Sheet by Scene Type
| Scene Type | Resolution | Bitrate | Frame Rate | Stabilization | ISO |
|---|---|---|---|---|---|
| Action sports | 8K | High | 30 fps | FlowState | 100–400 |
| Vlogging | 5.7K | Standard | 30 fps | Horizon Lock | 100–800 |
| Low light | 5.7K | Standard | 30 fps | FlowState | 800–1600 |
| Slow motion | 4K | High | 100 fps | FlowState | 100–400 |
| Reframing focus | 8K | High | 30 fps | FlowState | 100–400 |
| Social media | 5.7K | Standard | 30 fps | Horizon Lock | 100–800 |
File Size and Battery Life Estimates
| Resolution and Bitrate | File Size (per minute) | Battery Life (continuous) |
|---|---|---|
| 8K High | ~5 GB | 30–35 minutes |
| 8K Standard | ~3 GB | 35–40 minutes |
| 5.7K High | ~3 GB | 40–45 minutes |
| 5.7K Standard | ~1.5 GB | 45–50 minutes |
| 4K High | ~1.5 GB | 50–55 minutes |
| 4K Standard | ~0.8 GB | 55–60 minutes |
These are estimates. Actual numbers depend on temperature, stabilization, and lens correction. In hot weather, the battery life drops by 5 to 10 minutes.
When to Drop to 5.7K or 4K
Drop to 5.7K when you need longer recording, low light, or cooler operation. Drop to 4K when you need slow motion or maximum battery life. The 8K mode is for professional reframing and high‑quality output.
For everything else, 5.7K is the best balance. The same logic applies when setting up other cameras for specific tasks. For example, configuring a Reolink Argus 4 for outdoor use involves similar trade‑offs between resolution and battery life.
Frequently Asked Questions
How long can I record in 8K?
The X4 records 8K for about 30 to 35 minutes continuously. The battery is the main limit. The camera also has a thermal protection system that stops recording if it gets too hot.
In direct sunlight, you might get 20 to 25 minutes.
Does 8K improve stabilization?
Yes, but indirectly. 8K gives you more pixels to work with. When you reframe the footage, the stabilization algorithm has more data to use. The result is smoother and more stable footage.
The stabilization itself is the same as 5.7K.
Can I edit 8K footage on a laptop?
It depends on the laptop. 8K video requires a powerful processor and a dedicated graphics card. A laptop with an Intel i7 or i9 processor and a mid‑range GPU can handle it. A laptop with integrated graphics will struggle.
Use proxy files or edit in 4K for smoother playback.
Is 8K worth it for social media?
Not really. Social media platforms compress videos heavily. The difference between 8K and 5.7K is not visible on a phone screen.
The larger file size also takes longer to upload. For social media, 5.7K or 4K is more practical.
What is the best SD card for 8K?
A 256 GB V60 UHS‑I card is the best choice. It provides sustained write speeds of 60 MB/s, which is more than enough for 8K at the high bitrate. The SanDisk Extreme Pro and Samsung EVO Select are popular options.
Avoid cards rated below V30.
Does 8K overheat faster than 5.7K?
Yes. 8K generates more heat because the sensor and processor work harder. The camera can record 8K for about 20 to 25 minutes in direct sunlight. In the same conditions, 5.7K can record for 30 to 40 minutes.
For outdoor summer shoots, use 5.7K.
Final Verdict: When to Shoot 8K and When to Drop Down
Your Action Plan for Different Scenarios
Use 8K when you need maximum reframing flexibility. Use 5.7K for general shooting, vlogging, and low light. Use 4K for slow motion and long recording sessions.
The decision is simple: match the resolution to the scene.
For action sports, use 8K with high bitrate. For vlogging, use 5.7K with standard bitrate. For low light, use 5.7K with standard bitrate.
For slow motion, use 4K with high bitrate. For social media, use 5.7K with standard bitrate. This covers 90% of your shooting needs.
One Last Piece of Advice Before You Hit Record
The best settings are the ones that work for your specific scene. The X4 is a powerful tool, but it has limits. Respect those limits.
Do not force 8K when it is not needed. The camera will reward you with better footage, longer battery life, and fewer headaches.
Start with the quick preset. Adjust based on the lighting and movement. Keep a spare battery and a V60 SD card.
The process is similar to setting up other compact cameras. For example, adjusting the settings for a small action camera like the Insta360 GO 3S requires a similar approach. The rest is practice.
The more you shoot, the faster you will know which settings to use.

Similar Posts